Help! How to Read a Knitting Chart 🧶
Learn the basics of reading a knitting chart
A knitting chart is a graphic representation of a stitch pattern or knitted fabric, often used for intricate designs such as lace, cables, or colorwork.
At first glance, knitting charts can seem confusing and intimidating, often causing anxiety for beginner knitters. These charts transform the detailed instructions of a written pattern into a concise visual format. Once you grasp how the information is encoded, the chart simplifies understanding how stitches come together to create the intended pattern.
The compact nature of charts not only makes printing instructions easier but also helps in quickly spotting mistakes. Familiarity with charts will assist you in tracking your rows, diagnosing errors, and gaining a deeper understanding of knitting as a craft. Even if you prefer following row-by-row instructions, this knowledge will still prove useful.
In this post, I’ll guide you through the basics of reading knitting charts and explain why many advanced knitters enjoy using them.
What is a chart?
Charts are graphic representations of knitting instructions.
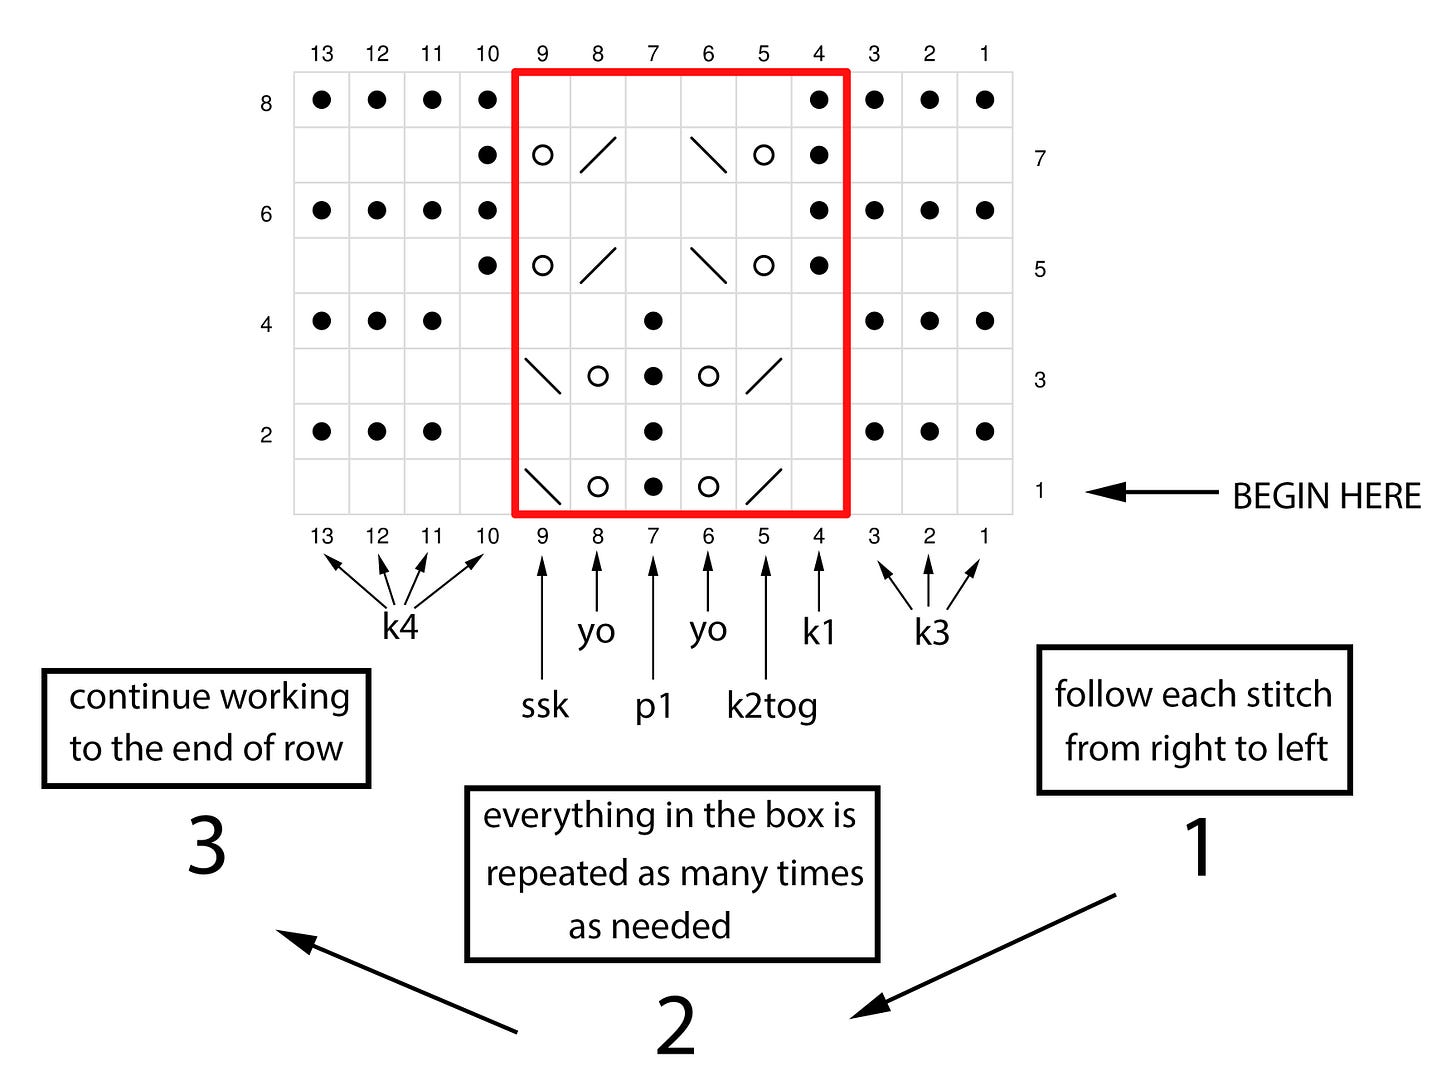
You can see an example below with arrow to indicate what each part of the graphic means:
Important Things to Keep in Mind:
A chart is a grid where each square represents one stitch as it appears on the front of your work.
Each cell corresponds to a single stitch, and each row of cells represents one row (or round) in the pattern.
Symbols are used to indicate different stitches or colors, with their definitions listed in the chart key.
Some of the symbols can have definitions for both the right side (RS) and wrong side (WS) of the fabric, meaning the stitch you work will depend on which side you’re on.
While many chart symbols are similar across publishers, it’s crucial to always check the chart key to ensure you interpret each symbol correctly.
Chart reading with flat knitting
Let’s dive deeper into chart reading using the same sample lace pattern above, but with a garter stitch border. Check out the image below and the description of the stitches in the first row:
The written instruction for the first row is:
Row 1 (RS): k3, *k1, k2tog, yo, p1, yo, ssk; repeat from * to last 4 stitches, k4.
Notice how the written instructions are exactly the same as the chart. The chart simply encodes each knitting abbreviation into a visual symbol, allowing you to follow the graphic if you understand what each symbol represents.
This is similar to written instructions: just as you needed to learn the abbreviations to follow a pattern, you now need to learn the symbols to read the chart.
Now let’s move to the second row (the wrong side of the fabric):
The written instruction for the second row is:
Row 2 (WS): k3, p1, *p2, k1, p3; repeat from * to last 3 stitches, k3.
Notice again how the stitches in the written instructions correspond exactly to the chart. For a wrong-side row, the key difference is that you read the chart from left to right.
Be mindful that some symbols may have different meanings depending on whether you're working on the right side or the wrong side of the fabric. For example, a blank box represents a knit stitch on the right side but a purl stitch on the wrong side. Always refer to the chart key to ensure you understand each symbol’s meaning.
Once you understand this visual 'code,' reading the chart becomes intuitive, allowing you to knit directly from the graphic representation of the pattern.
Summary
Here are some tips for reading a knitting chart when working flat:
Right-side rows (usually odd-numbered) are read from right to left.
Wrong-side rows (usually even-numbered) are read from left to right.
Right-side row numbers are located on the right side of the chart.
Wrong-side row numbers are located on the left side of the chart.
To begin, start at the bottom right corner of the chart and work across the stitches to the start of the pattern repeat.
Next, follow the pattern repeat for the required number of times, or until you reach the point where only the left edge stitches remain. Finish by working those remaining stitches.
What’s next?
Learning to read a knitting chart can feel like unlocking a superpower, even if you typically prefer written instructions. Charts offer a visual overview of the pattern's structure and are incredibly practical—just print the chart, toss it in your project bag, and travel light! Mastering chart reading not only enhances your skills but also grants access to patterns that are exclusively chart-based.
Give it a try! You might discover that you enjoy following charts—and that they help you grow as a knitter.
If you're looking for a great beginner-friendly chart pattern, check out my Entomologist Hat—perfect for first-time chart readers. [Click here to learn more!]
Did you enjoy this post? Would you like a follow-up covering topics like reading charts in the round, decoding "no stitch" spaces, or tackling colorwork? Let me know in the comments!


